If you’re a Google Apps user, you LOVE when Google releases new features and functions to the Google Apps platform. I know my fellow colleagues and I do and we hope you share the same excitement. It’s like Christmas all year round! Recently, Google released a new compose option for Gmail. Today, we will show you how to access the new feature, how to use it, and some of the useful features/functions it has to offer. Let’s explore the new compose experience below!
If you haven’t enabled the new compose feature already, you can do so by clicking on the big red ‘
Compose‘ button from within your inbox and then select
‘Try out the new compose experience.’
After electing to try the new experience, your inbox will refresh and you will be prompted to learn more about the new way of mail composition. The initial screen shown will highlight:
- Where the Cc & Bcc options are located
- Where the formatting & attachment options are located
- Where to delete the draft
- How to switch back to the old compose interface
- Where to look for ‘More’ options
Once you have taken note of each of these, select the blue ‘Got It’ button to proceed.
After selecting ‘Got It,’ the new compose window will be ready to go! We like to compare the new look to a chat window on steroids (it’s bigger). You’ll notice that when you hit the compose button, a new compose window will appear at the bottom of your screen where your chat windows are typically located. Now you can minimize your compose window and have multiple compose windows open at once!
This will help you work more efficiently in your inbox. Since the compose screen no longer takes up the majority of your inbox, you can easily search your inbox and reference another email without having to close or ‘pop-out’ your compose window.
New Compose Features
Now that you have the new compose experience enabled, let’s discuss the changes that have been made and some of the new features. We’ll start at the top, where you enter the recipients of the email message. You will notice that the ‘To’, ‘Cc’, and ‘Bcc’ lines have been combined in the new compose experience. If you are interested in adding an email address to be Cc’d or Bcc’d, simply click on the Cc and/or Bcc fields to the right of ‘To’ and those fields will expand as seen below.
One watch point here is that when you click on ‘Subject’, the email addresses will be compressed into one line. If you have added a Bcc, it will be noted that that person is Bcc’d. While you are composing your email, you will always have the ability to click in the recipient field to add or remove people.
Below the subject line (and above your signature, if applicable) is where you can begin to compose your email message. If you need to minimize, pop-out, or close your email window, you can do so by clicking on one of the three options located in the upper right hand corner of the compose window.
Formatting Options
The formatting options are located at the bottom of the new compose window. To access these options, click on the ‘A‘ and a series of options will appear. These include: Font, Text Size, Bold, Italic, Underline, Font Color, Numbered List, Bulleted List, Align, and Remove Formatting.
Inserting Extras
Another new enhancement of the new compose experience is the ability to insert a number of different ‘extras’ directly into your email. These extras include:
- Insert files using Drive: We really like this feature because the majority of Google Apps users use Google Drive to create and store documents. By clicking on the ‘Drive’ icon, you can now insert items directly from your My Drive, Shared with Me, Starred, Recently Selected, and All Items folders. A very valuable function to note here is that if you have not shared the Google Drive Document with the recipients of the email message, you will receive a prompt to share the document with the appropriate parties before sending the email (thus, cutting out the back and forth requests to access Drive items).
- Insert Photos: When clicking on the camera icon, you’ll see a prompt to add images that are stored on your computer or via URL. This new addition replaces the Inserting Images lab.
- Insert Link: The chain link image allows you to, after highlighting the word or phrase, insert a URL directly into your email content.
- Insert Emoticon: Who doesn’t like to add a little ‘flair’ to their emails? Nothing says ‘I’m joking’ better than a silly smiley face. 🙂 Click on the happy face icon to view the available emoticons (there are a TON).
- Tip: Hold down the ‘Shift‘ key when you need to select multiple emoticons for the message.
- Insert Invitation: After you have properly addressed your email message, you have the option to insert an invitation directly into the message. This can be done by clicking on the calendar icon. After clicking on that icon, you will be asked to add the information for the invitation. A great feature here is that the invitation prompt will show the recipients’ availability so you can see if everyone set to receive the email is available. If they are not available, you can always adjust the meeting time!

*Note* The paperclip image can be clicked to attach any files/folders located on your computer to the email. The insert extras bar, shown above, will appear immediately when you hover your mouse over the paperclip or ‘+’ icon.
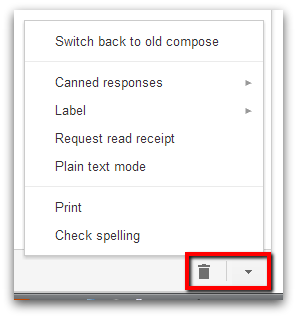
Trash & Options
Sometimes, we start an email and then find that the message is unnecessary. Not to worry, you can easily discard the draft by clicking on the trashcan icon located at the bottom right hand corner of the new compose experience.

Also located in the bottom right hand corner is the ‘Options’ section. To access these options, click on the upside down triangle ‘More Options’ to the right of the trash can. Here, you will be able to check spelling, print, access plain text mode, request a read receipt, add a label, insert/save/edit a canned response (if the lab is enabled), and….. If we haven’t wow’d you enough already with all these great new features, you can switch back to the old compose. We hope that’s not the case!
As you can see, the new compose experience provides you with a number of new ways to work more efficiently. We hope you will love the new compose as much as we do! If you would like to learn more about how you or your organization can apply the new enhancements to Google Apps, please visit the training section of our webinar. As always we would love to hear how you are using Google Apps in your business, so please comment below. And don’t forget, if you have any questions, we have “Dito Blog Office Hours” every Thurs, from 11-12pm est.