Please refer to our updated post Google Drive Storage: Pricing and Assigning in the New Admin Control Panel for updated information regarding Google Drive storage licenses.
Google Drive has enhanced the power of Google Apps by allowing users to store files from their computer in the cloud by simply dragging & dropping files in to the designated Google Drive folder. With this ability, users may want to store a collection of files greater than the allotted 5GB of data storage. If you have users like this in your organization, don’t worry, additional storage is available and can now be managed via the Admin Control Panel! Let’s take a look at how to activate and assign the storage space below.
Activating Additional Google Drive Storage
There are two ways to activate additional Google Drive storage for your domain. If your Google Apps for Business licenses are managed through a Reseller, you will need to contact your service provider (like Dito) and ask them to enable the Google Drive storage feature. After the service has been enabled, you will then be able to manage the Google Drive storage licenses from within the Admin Control Panel (we will discuss this later in the blog post).
If your account is not managed by a Reseller like Dito, you can enable the service yourself but will be required to enter specific billing information at the end of the steps below.
Log in to your Admin Control Panel … you may see a promotional Google Drive storage notice on the Dashboard. You can click directly on that link to enable the service. If you do not see the notification, you can follow the steps below to manually activate the service.
First, from within the Admin Control Panel, click on ‘Organizations & Users’ tab and then click on ‘Services’ next to the ‘Users’ tab.
Once you have reached the ‘Services’ page, click on the word ‘here’ in the phrase ‘Click here to add more Google Services to your domain.’
Under ‘Additional Paid Services’ you’ll see the option to enable Google Drive Storage. Click on ‘Add it now.’
Take a few minutes to review the service terms and price points for the additional Google Drive storage. You can click ‘Continue’ after reviewing each page to read additional information. Once you have finished reviewing the terms and conditions, click on ‘Accept and Continue.’ You will then be asked to enter your specific billing information for the licenses.
Now, if your account is managed by a Reseller like Dito, once you have clicked ‘Add it now,’ you will be prompted to contact your reseller. If you are a current customer of Dito, you can contact sales@ditoweb.com and we will enable the service for you.
Google Drive Storage Pricing
If users are in need of additional storage on top of the provided 5GB, review the pricing list below to see the amount of storage provided and the costs associated. The billing will be done on a monthly basis.
Assigning Google Drive Storage Licenses
Once you have activated additional Google Drive storage, you’ll have the ability to distribute the storage to your users. The distribution is done in the form of licenses and these licenses are managed from within your Admin Control Panel.
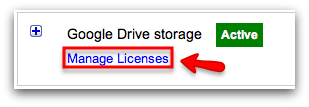
To access the Google Drive Storage license management portion of the Admin Control panel, simply click on ‘Domain Settings’ –> ‘Subscriptions & Billing.’ Locate the Google Drive Storage section and click on ‘Manage Licenses.’
After clicking on ‘Manage Licenses,’ you will be brought to the ‘Unassigned Users’ section of the license management page. Here, you will be able to select individual users or organizations that require additional storage. You can also search for individual users by entering their email address in the search bar. If you select an organizational unit as the recipient of additional storage, only that org unit and the users within will each receive additional storage licenses. Child/Sub orgs are not included, they will need to be selected per org.
If you have assigned Google Drive Storage licenses to users and wish to reassign these licenses, click on the ‘Assigned Users’ tab and select the user(s) that you wish to remove the storage from. These licenses will now be available for you to redistribute to other users.
The last tab that you will see is the ‘Manage Licenses’ tab. From here, you will be able to view the amount of licenses that you are currently managing, manage automatic license assignment, and assign bulk licenses to users via a .CSV file.
Now that you have the ability to provide users in your domain with additional Google Drive storage, the possibilities are endless when it comes to accessing your data! Will you be enabling additional Google Drive Storage licenses for your domain? Let us know in the comment section below. Also, please give this post a +1 if you found it fun and informative!