Google Sites is a great way to create websites without all the technical know-how of HTML. Better yet it has integration to a lot of your other Google Apps services like Calendar, Docs, Spreadsheets, Presentations, Drawings and more.
Many websites benefit with attention getting animated features. In fact, it conveys a sense of professionalism.
One of the most popular is Flash. With Flash you not only get a great looking appearance but also provide visitors with interactive options.
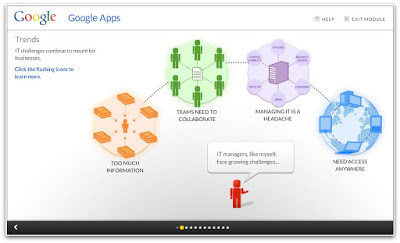
One such example is found on the public portion of the Google Partner Connect site where a Google Apps Introduction flash displays.
Some of the goals for web site developers are to keep visitors on a site as long as possible, to build their confidence with your service and/or product, and to get them to commit on your desired action (e.g. contact form). In the Google Partner Connect example the flash Google Apps Introduction achieves a lot of these goals.
Once you have a flash software tool and you build that awesome flash, how do you insert it on a Google Site?
These instructions were written without the need to enter or modify web site code (e.g. HTML, JavaScript, XML).
Before we begin, we need to answer this question. Is this a public or private Google Site?
Flash in Private (Intranet) Google Sites
Some flash software can host your flash creation and its files where you only need to insert a URL link on your site. However when using a private site, the following warning message appears because the secured Google (https) site recognizes insecure (http) links.
When this occurs the flash does not display unless the visitor clicks “Load anyway”. The warning message can be avoided by choosing a flash software product that allows access to the flash files so they can be uploaded to your private Google site. Here are the instructions.
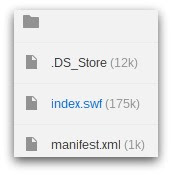
1. After you have built and saved your flash, there are folders and files.
2. On your Google Site create a web page that won’t be visible to visitors (not listed in navigation menu). You can call it “Flash”.
3. For your flash parent (top/root) folder, add the files to the Google Site “Flash” web page as attachments.
4. If you have a flash sub folder like “swfs”, you need to create a Google Site sub web page. The name of the sub web page must be called exactly as the flash sub folder name. In this example, create a new web page under the “Flash” page and call it “swfs” (..flash/swfs).
5. In some cases, you may have a flash sub folder under other sub folders. For example, the “swfs” folder may have a sub folder (e.g. “documents”). As before create a sub web page under “swfs” (..flash/swfs/documents). Again the flash folder name must match the name of the Google Site web page.
6. As done for the parent flash folder, for each flash sub folder add the flash files as web page attachments. For example, files within the flash sub folder “swfs” are added as attachments to the Google Site sub web page called “swfs” (..flash/swfs).
7. Back on the Google Site web page called “Flash” that contains file attachments for the flash parent folder, you should see a file that invokes the flash like “index.swf”. Right-click on this link and copy the link address.
8. Within your Google Site pick a web page or create one where you want to display the flash.
9. Click the edit icon on the web page.
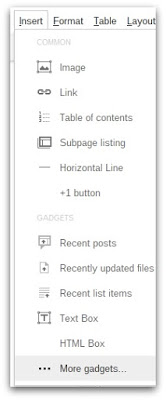
10. Next we need to insert an “iframe” gadget. Click on “Insert” and “More gadgets”. Search for “iframe”. Select an iframe gadget in the search results.
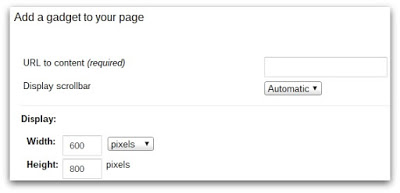
11. Within the iframe gadget parameter screen, paste the URL that you copied from the “index.swf” copy. Adjust the width and height that matches your flash.
12. Save until you exit the web page editor.
Flash in Public (Internet) Google Sites
If your flash software is not hosted where you have access to flash folders and files, you may follow the “Private (Intranet)” instructions above.
Otherwise, here are the instructions for hosted flash software like WIX.
1. Sign into your hosted flash software.
2. Find the option to “publish” your flash.
3. After publishing, copy the provided URL link.
4. Within your Google Site, pick a web page or create one where you want to display the flash.
5. Click the edit icon on the web page.
6. Next we need to insert an “iframe” gadget. Click on “Insert” and “More gadgets”. Search for “iframe”. Select an iframe gadget in the search results.
7. Within the iframe gadget parameter screen, paste the “publish” URL that you copied from the flash host. Adjust the width and height that matches your flash.
8. Save until you exit the web page editor.
Give it a try and let us know how much you like Flash in your Google Sites in the comments section below! Also, if you found this blog post informative, give it a +1 so others can receive the same benefits.
